Hi, I'm Joren. Welcome to my website. I'm a research software engineer in the field of Music Informatics and Digital Humanities. Here you can find a record of my research and projects I have been working on. Learn more »
A couple of days ago, OnTracx launched their first product: a system to measure impact during running with the aim to become ‘The Future of injury-free running’. Next to the launch event itself, OnTracx was featured in the nationalmedia as well.
OnTracx is a Ghent University spin-off and their product is based on a couple of scientific studies. I had the chance to collaborate on some of these studies:
Van den Berghe, P., Lorenzoni, V., Derie, R., Six, J., Gerlo, J., Leman, M., & De Clercq, D. (2021). Music-based biofeedback to reduce tibial shock in over-ground running: A proof-of-concept study. Scientific reports
As is already clear from the title of the second paper: originally the idea was to use music-based biofeedback as a way to reduce impact. Unfortunately, this feature is not - yet? - present in the commercial project which focuses on the measurement and clearly reporting a proxy to mechanical load. This does make the message focused and is probably a good commercial move. I bought one of the sensors and already tested it out during a 5k-run. I was pleasantly surprised with the smooth on-boarding and the slick, well thought-out, user-friendly app.
Become part of the ‘The Future of injury-free running’ and go and get OnTracx!
The product launch
The OnTracx CEO during the Flanders Technology and Innovation festival
There is something about surprising interfaces: clapping to switch on lights is more fun than a flipping a switch. Pressing a panic-button to order a pizza is more fun than ordering via an app. Recently I came across this surprising interface: a flute controlled mouse cursor for a first person shooter. I recognize a good idea when I see one, and immediately wanted replicate the idea and make it freely available. So I got to work:
Vid: a microcontroller controlling mouse movements based on pitch detection.
What do we need for flute-based mouse? First we need a way to determine if a note is being played and if a note is produced, we need to be able to determine which note is being played by the musician. Next, we need to hijack and control a cursor via the detected note and trigger a click event when a specific note is played. Finally we need to play a flute, preferably a recorder, to move the mouse cursor in an obviously superior and relaxed fashion. It is not strictly required to use a recorder but a recorder is very much advised.
The note determination can be done by a fundamental frequency detector. A detector returns a frequency in Hertz and a confidence score which tells you how reliable the detection is. With some filtering, this is exactly what we need. If the frequency is close enough to a configured value, a note is detected. The confidence score tells us to either accept or ignore the detection. With this info it is possible to connect a note-detection to an action - like moving a cursor left or right, up or down.
Finally we need to move the mouse cursor. There are a few ways to do this.
Fig: Flute-based web-browsing as envisioned by its developer.
A portable way to move a mouse cursor is to let a micro-controller impersonate as a standard mouse, a ‘USB Human Interface Device’. Once the micro-controller is attached via USB it registers as a mouse and allows to move the cursor and register click events. To build a flute-based mouse, the micro-controller then needs a microphone and a pitch estimator to finally send cursor events.
I based my project on an RP2040 - a micro-controller chip designed by Raspberry Pi - since it offers a simple way to present itself to an operating system as a mouse. Just include PluggableUSBHID.h and USBMouse.h and use the Mouse API to control the mouse. For me it only behaved as a standard mouse if Serial is not used at the same time: in other words the dual USB profile does not seem to work reliably.
Sending mouse events from your code looks, for example, like ` Mouse.move(-4, 7)` to move the mouse minus four units in the horizontal and seven units in the vertical direction. Click events have a similarly straightforward API. The RP2040 also has a built-in microphone, which makes it ideal for audio applications, or so it seems.
Unfortunately, the RP2040 chip performs poorly for computationally heavy audio processing workloads. Such applications need to perform many floating point operations per second, but the RP2040 lacks a hardware floating point unit (FPU) which makes it relatively slow. When attempting to run a pitch-detection algorithm, the RP2040 was too slow to run the algorithm in real-time. After profiling the pitch estimation algorithm there was a clear place where most float operations occurred. Replacing those with much quicker fixed point operations makes the algorithm faster than real-time and usable on the RP2040.lt
To give a sens of the difference in speed between fixed point and floating point operations on the RP2040: with the default arduino build process, a million floating point operations take over 883 000 microseconds, a million fixed point operations take 8 microseconds. Fixed point operations are around 5 orders of magnitude faster!
The hardware based solution works reliably but, evidently, it needs a piece of hardware. To make sure everybody can enjoy a solution in software is provided in this section in the form of a chrome browser extension.
Moving a cursor is not possible in a browser: if a pointer location could be modified it would open a whole range of possibilities for abuse. A surprisingly easy workaround, however, is to hide the actual cursor and show a replacement cursor-like icon. This fake cursor can be moved programmatically. With the position of this fake cursor known, a click event can be triggered and result in, for example, following a link.
To take this idea to its logical next step, I implemented a chrome browser plug-in for flute-based web-browsing. I also relased this on GitHub under the Pitch perfect Pointer Positioning or PiPePoPo brand. Check the installation instructions in the PiPePoPo repository. Perhaps most of interest is how audio processing is handled by a Web Audio API Audio Worklet.
Vid: Controlling a cursor via a browser extension.
Join the flute-based web-browsing revolution today and experience web browsing like never before and install PiPePoPo.
Due to the climate crisis, long droughts are becoming more common in Western Europe during the summers. Conversely, during the winters, it seems that there is more and more extreme rainfall. With record breaking droughts and rainfall, it is essential that enough rainwater buffering capacity is available. As a private citizen this means installing a large rain water tank - perhaps larger than outdated models suggest - and using the captured water effectively, if at all possible.
Fig: Submersible water level meter.
To effectively use rain-water, it helps to have an easy way to view the water level in the tank. This makes clear when to conserve water or when a pump might end up running dry and overheat. So I wanted to install a water level measurement device in my rain water tank.
My first attempt used sonar. This sends out a sound-wave which reflects on the water surface. The sonar measures the time it takes for the echo to return. This setup is finicky in an echoy tank but I managed to get it working. However, after couple of months the sonar stopped working in the damp environment.
Next I tried a optical, infra-red-based setup: the idea was to time the infra-red reflection on the water. After installation it appeared that water is transparent for infra-red. I basically measured the position of the floor of my tank. I took comfort in the fact that this measurement remained stable but had to look for a third option.
I finally became aware of sturdy, submersible pressure sensors which are designed for water level measurements. One of those is the QDY30A sensor, which is available in many versions but there is one which takes five volts as input and returns a 0 - 3.3V output: ideal to use with about any modern micro-controller. The sensor can be connected via a long cable. This helps to keep the Arduino in a dry place indoors. After recording a few measurements and the corresponding sensor depth, the sensor seems to show a very linear response: with two references, converting a sensor value to a depth in millimeters is doable. The readings ended up on a website and are visualized via a SVG sparkline.
Fig: Rain water level visualization for a few days, measured every 15 minutes. Going from 221cm to 197cm.
With the Arduino code attached you should be able to get going. Next to reading and converting a sensor value, it also includes reading the median of several values to add some smoothing. The sensor is read on request: only when a serial message arrives a measurement is done.
At the Ghent Center for Digital Humanities we provide software services for researchers. Think about, for example, annotation platforms for ancient texts or collaborative databases with geographically referenced historical data. Each of those services need some kind of authentication and user management: some parts of the service might be public, some only accessible for researchers at Ghent University and other parts need to be accessible e.g. to external researchers or collaborators. Providing authentication, login-flows and user management for each and every service quickly becomes tedious and, frankly, boring.
We went looking for a solution and stumbled on Keycloak. Keycloak is an open source Identity and Access Management system and is able to either authenticate users itself or pass through authenticate to other authentication providers like LDAP, GitHub, OAuth accounts, or others. It avoids the need to setup application-specific user management system. Flows like ‘forget password’, ‘verify email’, ‘two factor authentication’ are not part of your application itself but are provided by Keycloak. Leaving the developer to focus on application specific tasks.
Video: An API call to a protected back-end first fails. After authentication and receiving a JWT token, the back-end call succeeds. The authenticated session is then shown in Keycloak.
Integration with Keycloak is a bit of work and not straightforward. As part of trying out Keycloak I have created a minimal working example of a front-end / back-end system which uses Keycloak for authentication. To get full access to the back-end API the user first needs a valid JWT-token provided by Keycloak. The flow can be seen in the video above. The dockerized environment can perhaps serve as inspiration for similar setups. Please do try out the dockerized minimal working example and see if Keycloak can fit your use-case.
I have asked ChatGPT to generate 3D models. ChatGPT can not generate 3D models directly but 3D models can generated via intermediary OpenSCAD scripts: OpenSCAD provides a scripting language to describe objects which can be combined to form 3D models. ChatGPT understands the syntax of this scripting language and generates perfectly cromulent scripts. I have asked two versions of ChatGPT to generate a 3D model of a house, a cat, a stick figure, a chair and a tree. The results are interesting…
The models immediately make the difference between ChatGPT 3.5 Turbo and ChatGPT 4.0 clear: 4.0 generates much better models with, at least, recognizable elements: a chair has four legs, a cat has a head and a tail. It is impressive that reasonable 3D models are generated but there is still room for improvement: proportions are not respected and elements are not always connected. Anyway, if the 3D-models can be seen as a way to visualize code quality, then 4.0 is a clear improvement and it makes me curious about future ChatGPT versions. It also made me reflect on a couple of aspects of LLMs in general.
Fig: a black box generating 3D models.
ephemerality The response of a LLM to a prompt is ephemeral: the same prompt causes a different response depending on context, randomness and the position of heavenly bodies - or so it seems. Traditional software systems follow a strict set of clear rules and provide deterministic, predictable and reliable results. The inverse is true for LLMs which takes some getting used to. As a user, an LLM is effectively a vantablack box - there is no way to know why a certain response was given instead of another.
Updates LLMs services - and SaaS in general - have an additional feature which makes them even more unpredictable: updates to systems can happen without notice. After a recent unannounced update, for example, ChatGPT 4 started to produce gibberish. This adds another layer to the already uncontrollable and ephemeral nature of responses to LLM prompts.
To counter the ephemeral quality of prompt responses, I have 3D printed the generated 3D models. Some pictures can be found below. I find that these physical, tangible, immutable objects provide a comforting counterbalance to the digital, ephemeral nature of LLM responses. Additionally, it highlights the absurdity of the generated models.
There are other ways to solidify ephemerality: crochet patterns, juggling patterns, guitar tablature, music notation all have some kind of structured text representation which LLMs can generate and which can have a physical representation. I would encourage people to bring prompt responses to the physical world: it really makes the - current - limitations of LLMs very clear.
At the Ghent Center for Digital Humanities (GhentCDH) we offer IT-services mainly for researchers in the Humanities at Ghent University. The services range from internal collaborative research tools to publicly facing science communication platforms. Technically, it is a mix of off the shelve software with or without modifications and custom solutions using several technical stacks. It is a challenge to keep these services running, secure and up-to-date for years with a limited budget.
In an attempt to make maintenance of these services more manageable we are in the process of containerizing our software. Running software in containers has advantages. One of the advantages is a guaranteed consistency across environments. Also, isolated software containers can be beneficial for security and stability. It also allows one to run different versions of a stack on the same server without running into compatibility problems.
Next to running software in containers, development in containers also has advantages. It allows you to switch projects easily without needing to install dependencies - e.g a specific database system version - directly on a development machine. The main advantage I see is that containerization promotes developer hygiene. Stereotypically, developers do not have the best hygiene and can use any available help. Containerization forces developers to think about separation of code and configuration, code and data and it forces to be explicit about dependencies and environmental assumptions.
The main disadvantage is that some configuration is needed to get the containers running and that there is a small performance penalty. The following might help with that first part.
Dockerized Python database development
To put the theory to the test my colleagues and I put together a GitHub repository with a dockerized Python development setup. It shows interaction between Python and a PostgreSQL database. The database system runs in a container and the development environment is also kept in a container. Both containers are started with docker compose and configured via a .env file.
The stack uses a recent Python version, PDM to resolve Python dependencies and SQLAlchemy to interact with the PostgreSQL database. The VS code editor allows developers to run and debug software in a container. The video below shows the startup procedure and setting a breakpoint in some Python code.
Vid: Starting a database server and development container. Running and debugging Python code in a container.
Note that this is just an example setup, your setup might look quite different. You might need a different stack, use a different container environment (e.g. podman) or IDE but the principle of container based development could stay the same.
I have put off using containers for quite a while and I am quite a late convert, but now that I am doing more technical work in a small team I do see the advantages of an easy-to-set up, controlled, containerized development with explicitly defined dependencies. If you have no experience with containers yet, I would encourage you to at least try container based development out and see where it could help you!
A couple of months ago, OnTracx, a Ghent University sports-tech spin-off launched with the ‘dream of a world where every runner can stay injury-free’. That dream is based on a firmly grounded interdisciplinary research project, which I was fortunate to contributed to. The research project - headed by the UGent sports science department - developed a music-based bio-feedback system to reduce footfall shock while running with the aim to lower common running-related injury risk. I fondly remember soldering and programing the first cluncky prototypes, now already eight years ago!
In my role, I contributed to several key papers that form the foundation of OnTracx. Notably, the ‘validity and reliability’ paper, which has become the most cited work in my academic portfolio, which at least indicates academic interest. The main author of the paper is now doing a post-doc in Harvard, so he must have been doing something right! Additionally, I am also recognized as co-inventor on a patent related to the system.
Van den Berghe, P., Lorenzoni, V., Derie, R., Six, J., Gerlo, J., Leman, M., & De Clercq, D. (2021). Music-based biofeedback to reduce tibial shock in over-ground running: A proof-of-concept study. Scientific reports
Fig: schema of the low impact runner research system. Foot-fall impact is measured with wearable sensors and music-based feedback is given to the runner with the aim to avoid high impact.
The journey from research to commercial realization is always thrilling. As OnTracx steps into the market, I am filled with hope and anticipation for its success, mirroring and potentially exceeding the fruitful research track.
My ex-girlfriend and current wife likes maps. While looking for a gift for the new-years I got the idea to give her a 3D map of the nearby historic city center of Ghent with its three iconic towers. I have a 3D printer at home but still need to find a printable 3D model of Ghent.
Luckily, a couple of days ago a piece of software appeared to capture Google Earth tiles -cubes- into a single 3D file. There you can select an area of interest via google maps and download a GLTF file which captures the landscape in 3D. The software needs an API key which can be requested via the Google Developer tools.
After downloading a GLTF file, the 3D model needs to be made 3D-printable. There are online GLTF to STL converters but a bit of care needs to be taken to end up with an actually printable STL. My selected area of interest only has slight height differences in the landscape which are handled by placing the STL file on a base which compensates for these differences. Your 3D slicer can also generate structure to support inclinations in the landscape.
The 3D model generated by Google Earth is quite noisy and can contain floating parts and holes. It may be needed to edit the STL mesh directly. Selecting a slightly shifted area of interest may also solve problems with the edges of the print: take care to chop less buildings in two.
Have fun printing your own piece of the world!
Fig: a 3D model for the Ghent city center visualized with an Three.js STL viewer.
Elektor, a hobby electronics magazine, recently featured an article on acoustic fingerprinting using the ESP32. It is included in a special edition on Espressive products like the ESP32. This article includes content previously published on this blog and other writings about Olaf.
Since the article is based on my writings, there was an agreement to allow one of their writers to compose the magazine article under my name. This was my first experience with having a ghostwriter – quite convenient, I must say. Although it’s somewhat apparent that the article is compiled from various sources, I am overall pleased with the outcome. It even made the front page!
Elektor has a rich history, dating back to the early 1960s when it was first published in Dutch as ‘Elektuur’. I have fond memories of browsing Elektuur at my nerdy uncle’s place. If anything, this article has certainly earned me some nerd credibility points in my uncle’s eyes.
Fig: Hammer vs. screw. Not the right tool for the job.
For the last couple of years this blog has not been using any Javascript. During the last decade this has become quite rare. Only 1.2% of websites do not use Javascript I see this as a problem. In this text I want to argue that Javascript is perhaps not always the right tool for the job. Especially for web-pages which visitors simply want to read and where no explicit interactive actions are wanted from a user perspective, I see Javascript as detrimental.
I was triggered to write this by a few observations. One is by a Rails frontend framework which claims that “the only technology we should be using to create web UI is JavaScript”. This implies that the whole DOM should be rendered by Javascript. On the other hand there are frameworks which now advertise server side rendering as new feature like Blazor and Nuxt. The old thing is new again.
Let’s look at a few examples. Take visiting news website. On a news site, a user expects to be able to read current news, reviews, opinions, .. and there is no expectation of interactivity. Basically, a news site could work equally well on physical paper, as was the case for the last century or more. Ideally, a news site is a static HTML page with an easy to follow layout and some images, perhaps some static ads, with information flowing in a single direction.
If we look at, for example, the Guardian, we do not get this ideal experience, instead 82 Javascript files are loaded and the full website takes six full seconds to load on a fast fiber connection. The site even tries to load files from other domains. This bloat results in 8 website programming errors and CORS-issues. The Guardian website is far from the worst example of this sprawl of Javascript, the front-end for the Guaridan is even developed in the open.
Another news site is Hacker News. With its focus on Sillicon valley and technical news, this site has probably one of the most tech-savvy readers and … it does not rely on Javascript for functioning. There is a single small, readable 150 line script to improve usability but that is it. The makes the the website fast, easily indexable, straightforward to maintain, accessible, future-proof, failsafe, and compatible with even the most basic browsers and screen-readers.
Similarly, this blog is a dynamic Rails site but thanks to extensive use of server-side rendering and caching it behaves more like a static site generator: once everything is cached, the application mostly serves static HTML fragments. The client-side requirements are minimal as well: since no Javascript is used to modify the DOM - or even at all - lay-outing is straightforward.
Note that some blog posts feature advanced web application prototypes which do use a boatload of Javascript e.g. to convert audio, visualize audio, interact with micro-controllers or MIDI instruments,… . These prototypes use many of the available browser APIs like the Web Audio API, WebAssembly, Web MIDI API, Web Bluetooth API, WebGL, …. I really do like targeting modern browsers with offer many possibilities to build easy-to-use applications. But that is exactly a distinction that needs to be made: applications versus pages. Javascript versus No Javascript.


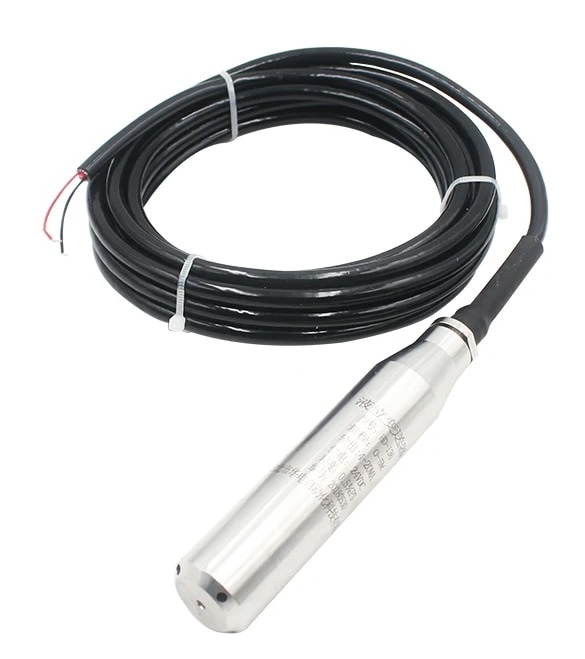
 Fig: a black box generating 3D models.